Table of contents
Open Table of contents
Resilience4j
Resilience4j 는 Netflix Hystrix에서 영감을 받은 lightweight fault tolerance 라이브러리입니다.
Circuit Breaker, Rate Limiter, Retry 또는 Bulkhead와 같은 기능을 함수형 인터페이스 및 람다 표현식, 고차 함수(데코레이터) 사용하여 제공합니다.
Resilience4j 2는 Java 17 이상을 지원합니다.
미리보기
다음 예제에서는 예외가 발생할 때 최대 3회 호출을 재시도하기 위해 CircuitBreaker와 Retry를 사용하는 방법을 보여줍니다.
재시도 사이의 고정된 시간 간격은 500ms을 사용합니다. 사용자 지정 backoff 알고리즘을 사용할 수도 있습니다.
val testService = object {
        fun doSomething(): String {
            return "doSomething"
        }
    }

    // Create a CircuitBreaker with default configuration
    val circuitBreaker = CircuitBreaker.ofDefaults("test")

    // Create a Retry with default configuration
    // 3 retry attempts and a fixed time interval between retries of 500ms
    val retry = Retry.ofDefaults("test")

    // Create a Blukhead with default configuration
    val bulkhead = Bulkhead.ofDefaults("test")

    val supplier = Supplier<String> { testService.doSomething() }

    // Decorate your call to testService.doSomething()
    // with a Bulkhead, CircuitBreaker and Retry
    // **note: you will need the resilience4j-all dependency for this
    val decoratedSupplier = Decorators.ofSupplier(supplier)
        .withCircuitBreaker(CircuitBreaker.ofDefaults("test"))
        .withRetry(Retry.ofDefaults("test"))
        .withBulkhead(Bulkhead.ofDefaults("test"))
        .decorate()

    circuitBreaker.executeSupplier(testService::doSomething)

    // You can also run the supplier asynchronously in a ThreadPoolBulkhead
    val threadPoolBulkhead = ThreadPoolBulkhead.ofDefaults("test")

    // The Scheduler is needed to schedule a timeout
    // on a non-blocking CompletableFuture
    val scheduledExecutorService = Executors.newScheduledThreadPool(3)
    val timeLimiter = TimeLimiter.of(Duration.ofSeconds(1))

    val future = Decorators.ofSupplier(supplier)
        .withThreadPoolBulkhead(threadPoolBulkhead)
        .withTimeLimiter(timeLimiter, scheduledExecutorService)
        .withCircuitBreaker(circuitBreaker)
        .withFallback(listOf(
            TimeoutException::class.java,
            CallNotPermittedException::class.java,
            BulkheadFullException::class.java
        )) { "Hello from Recovery" }
        .get().toCompletableFuture()
이제 샘플 코드를 완벽히 이해하기위해 문서의 각 가이드를 하나씩 따라가보도록 하겠습니다.
RateLimiter
RateLimiter는 주어진 시간 동안 호출을 제한하는 데 사용됩니다. 이를 통해 고가용성과 안정성을 확립할 수 있습니다.
RateLimiter는 요청량 한도에 대해 초과할 경우 처리하는 방법이나 제한하려는 요청 유형에 대한 다양한 옵션이 제공됩니다.
한도가 초과될 때 요청을 거부하거나 나중에 실행할 대기열을 구축하거나 요청을 폐기하거나 다른 처리 방법을 선택할 수 있습니다.
동작방식

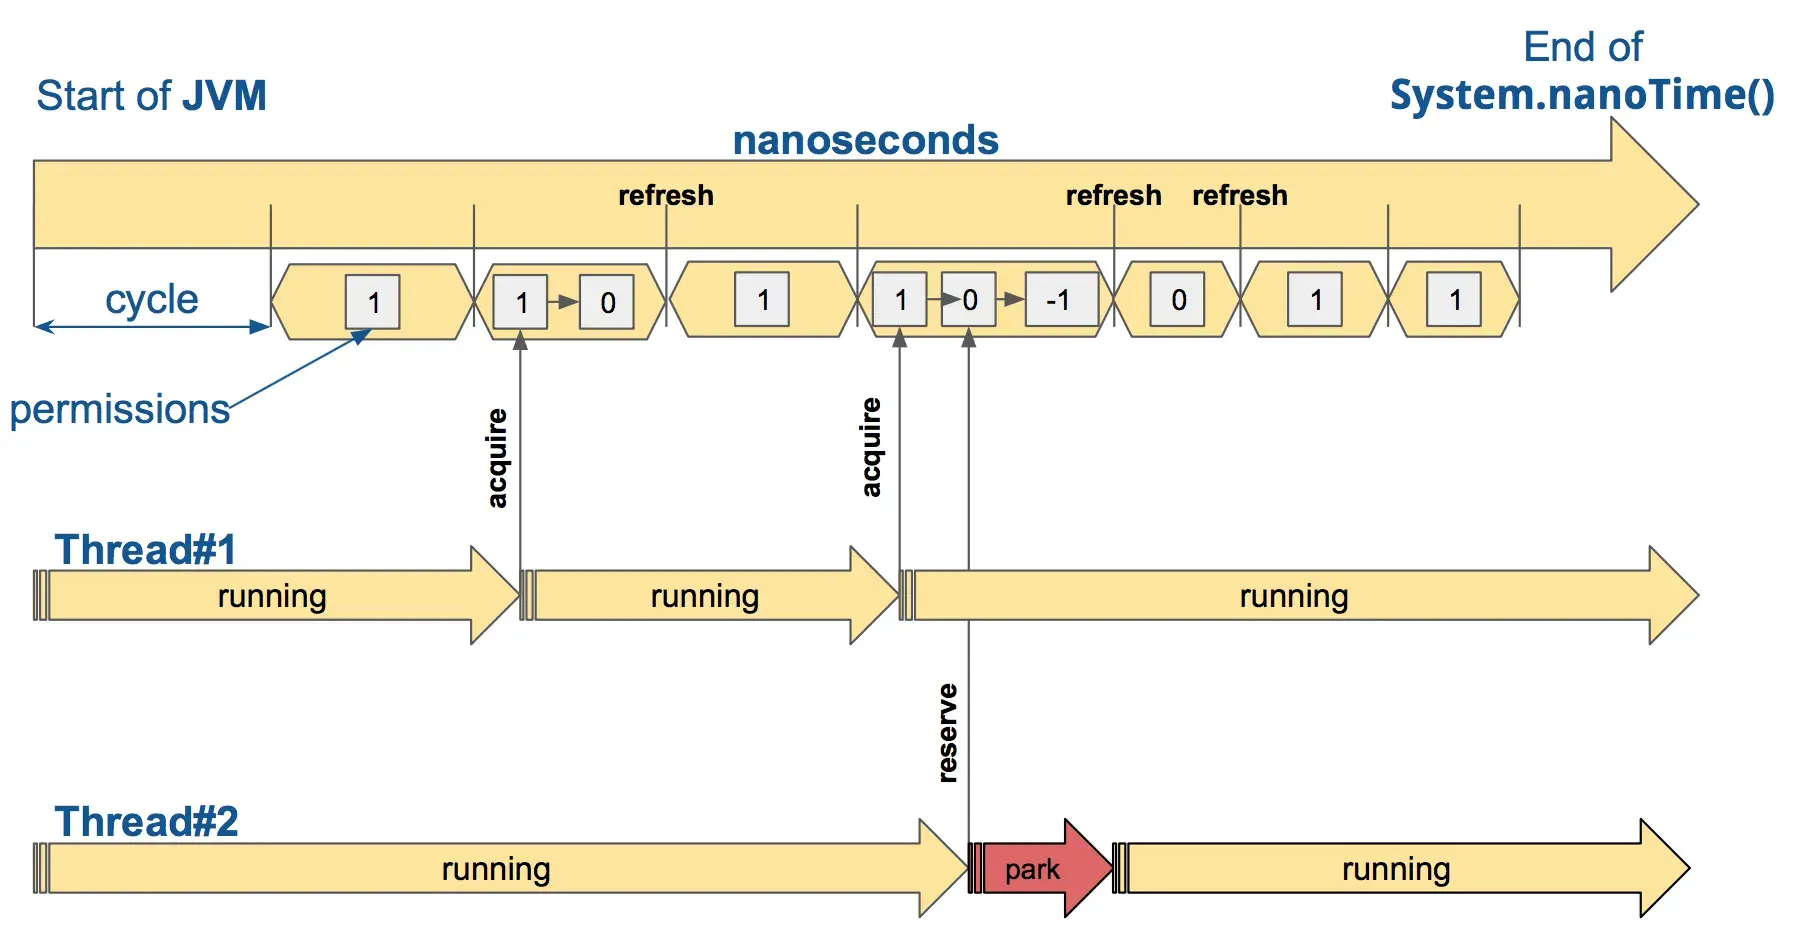
Resilience4j는 epoch의 시작(1970년 1월 1일 00:00:00 UTC)부터의 나노초 단위로 시간을 주기로 나눕니다.
각 주기는 RateLimiterConfig.limitRefreshPeriod로 설정된 시간 동안 지속됩니다.
그리고 각 주기가 시작될 때마다 RateLimiter는 그 주기 동안 허용할 수 있는 최대 요청 수를 RateLimiterConfig.limitForPeriod로 설정합니다.
Resilience4j의 RateLimiter에는 두 가지 주요 구현체가 있습니다.
AtomicRateLimiter와 SemaphoreBasedRateLimiter입니다.
AtomicRateLimiter
RateLimiter의 기본 구현체는 AtomicRateLimiter를 통해 상태를 관리하는 것입니다.
activeCycle: 마지막 호출에 사용된 사이클 번호, 이는RateLimiter가 주기를 어떻게 나누어 사용하는지 나타냅니다.activePermissions: 마지막 호출 후 남아 있는 사용 가능한 권한(permissions)의 수입니다. 만약 권한이 초과하여 예약되었다면, 이 값은 음수가 될 수도 있습니다.nanosToWait: 마지막 호출에서 권한을 얻기 위해 기다려야 했던 나노초의 수입니다.
SemaphoreBasedRateLimiter
SemaphoreBasedRateLimiter는 Semaphore를 사용하여 권한을 관리합니다.
Semaphore는 주로 동시성을 제어하기 위한 도구로, 동시에 접근할 수 있는 리소스의 수를 제한하는데 사용됩니다.
이 구현체는 스케줄러를 사용하여 RateLimiterConfig.limitRefreshPeriod가 지날 때마다 Semaphore를 초기화합니다.
RateLimiterRegistry
RateLimiterRegistry는 RateLimiter 인스턴스를 생성 및 검색 관리하는 데 사용됩니다.
val rateLimiterRegistry = RateLimiterRegistry.ofDefaults()RateLimiter 생성 및 구성
커스텀 RateLimiterConfig를 사용하여 RateLimiter를 생성할 수 있습니다.
RateLimiterConfig 빌더를 통해 생성가능하며 다음 속성을 구성할 수 있습니다.
| Config property | Default value | Description |
|---|---|---|
| timeoutDuration | 5 [s] | 스레드가 권한을 기다리는 기본 대기 시간 |
| limitRefreshPeriod | 500 [ns] | 제한 갱신 주기. 각 주기가 끝날 때마다 rate limiter는 권한 수를 limitForPeriod 값으로 다시 설정합니다 |
| limitForPeriod | 50 | 한 제한 갱신 주기 동안 사용 가능한 권한 수 |
함수형 인터페이스로 데코레이팅 및 호출
config 를 테스트하기 위해 testService.doSomething()을 호출하는 함수를 만들어 보았습니다.
테스트 조건은 1초에 최대 2회만 호출이 가능하도록 제한을 두었습니다.
권한을 얻지 못해 대기하는 경우 0.8초 후에 호출이 실패하도록 설정하였습니다.
아래 코드는 위 조건으로 총 3번의 요청을 순차적으로 시도합니다.
val config = RateLimiterConfig.custom()
        .limitRefreshPeriod(ofMillis(1000))
        .limitForPeriod(2)
        .timeoutDuration(ofMillis(800))
        .build()

    val rateLimiterRegistry = RateLimiterRegistry.of(config)

    val rateLimiter = rateLimiterRegistry.rateLimiter("name1")

    val testService = object {
        fun doSomething() {
            println("${Thread.currentThread().name} - ${System.currentTimeMillis()}")
        }
    }

    val restrictedCall = RateLimiter.decorateCheckedRunnable(rateLimiter, testService::doSomething)

    Try.run(restrictedCall)
        .andThenTry(restrictedCall)
        .andThenTry(restrictedCall)
        .onFailure { println("Rate limit exceeded") }

// main - 1724778793171
// main - 1724778793179
// Rate limit exceeded
처음 2회는 성공적으로 호출되었지만, 3회째 호출은 권한을 얻지 못해 대기하는 시간(0.8초)이 초과되어 실패하였습니다.
동시 요청
동일한 조건으로 서로 다른 2개의 스레드에서 연속으로 2번 요청을 하면 어떻게 될지(thread safe) 확인해보았습니다.
// 여러 스레드 동시 호출
    val thread1 = Thread {
        Try.run(restrictedCall)
            .andThenTry(restrictedCall)
            .onFailure { println("Rate limit exceeded") }
    }

    val thread2 = Thread {
        Try.run(restrictedCall)
            .andThenTry(restrictedCall)
            .onFailure { println("Rate limit exceeded") }
    }

    thread1.start()
    thread2.start()

// Thread-1 - 1724779142897
// Thread-0 - 1724779142897
// Rate limit exceeded
// Rate limit exceeded
두 스레드가 동시에 요청을 하였지만, 2회째 요청부터는 두 스레드 모두 권한을 얻지 못해 대기하는 시간(0.8초)이 초과되어 실패하였습니다.
timeoutDuration 확인
첫 번째 테스트에서는 연속적으로 실행해 보았지만 권한이 갱신되기 직전인 0.8초 경에 요청을 하면 어떻게 될까요?
Try.run(restrictedCall)
    .andThenTry(restrictedCall)
    .andThenTry ( CheckedRunnable { Thread.sleep(800) } )
    .andThenTry(restrictedCall)
    .onFailure { println("Rate limit exceeded") }

// main - 1724780278094
// main - 1724780278101
// main - 1724780279084
3회째 요청은 0.8초 대기 후에 성공적으로 호출되었습니다.
RegistryEvents, RateLimiterEvents
RegistryEvents
RateLimiterRegistry 에 event consumer를 등록하여 RateLimiter가 생성, 교체, 삭제될 때마다 특정 로직을 수행하도록 할 수 있습니다.
val rateLimiterRegistry = RateLimiterRegistry.ofDefaults()

rateLimiterRegistry.eventPublisher.onEntryAdded { println("RateLimiter added: $it") }
rateLimiterRegistry.eventPublisher.onEntryRemoved { println("RateLimiter removed: $it") }
rateLimiterRegistry.eventPublisher.onEntryReplaced { println("RateLimiter replaced: $it") }

val rateLimiter = rateLimiterRegistry.rateLimiter("name1")
rateLimiterRegistry.replace("name1", rateLimiter)
rateLimiterRegistry.remove("name1")

// RateLimiter added: io.github.resilience4j.core.registry.EntryAddedEvent@41906a77
// RateLimiter replaced: io.github.resilience4j.core.registry.EntryReplacedEvent@5387f9e0
// RateLimiter removed: io.github.resilience4j.core.registry.EntryRemovedEvent@2cdf8d8a
RateLimiterEvents
RateLimiter 에 event consumer를 등록하여 RateLimiter가 특정 이벤트가 발생할 때마다 로직을 수행하도록 스트림을 생성합니다.
모든 이벤트에는 이벤트 생성시간, rate limiter의 이름 같은 추가정보도 포함됩니다.
val rateLimiter = RateLimiterRegistry.ofDefaults().rateLimiter("name1")
rateLimiter.eventPublisher.also {
    it.onSuccess { println("Success: $it") }
    it.onFailure { println("Failure: $it") }
}